
Description
INSTRUCTIONAL VIDEO
FEATURES AND BENEFITS
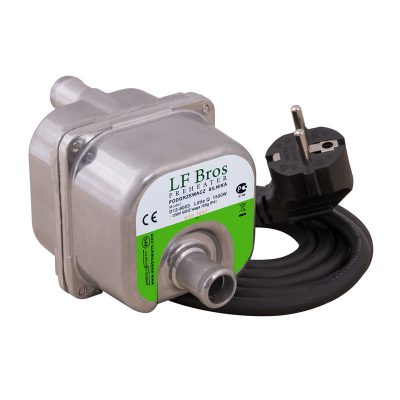
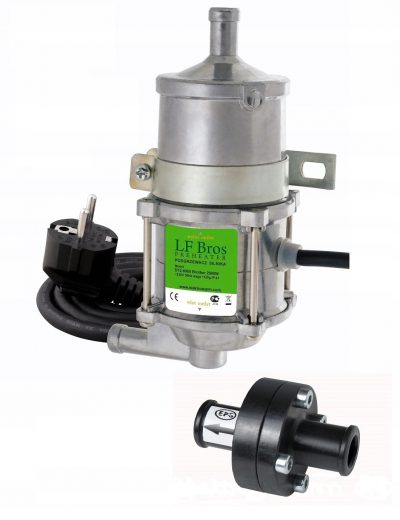
An engine heater is a modern device which heats the cylinder block. A characteristic feature of the gravitation heater is quiet work. When the heater is used, even in the winter, the start-up of the engine is as easy as in the summer. Thanks to startup of an engine which is already heated, it gets worn longer, consumes less fuel and at the same time generates less harmful combustion gas.
PRINCIPLE OF OPERATION
Work of the engine heater D-12-PC1000T is possible thanks to the use of gravitation movement of the heated liquid. The heated, lighter liquid moves up and it is replaced by sucked cold liquid. The heater should be connected to the lower rubber conduit connecting the cooler with the engine block. After the device is turned on, the electric heater placed inside the housing heats the cooling liquid which circulates in the engine block and heats it. The device, after it reaches the temperature of approximately 60°C, is turned off by a thermostat. It turns on again after the temperature falls down to approximately 5°C.
Note: Before you turn on the heater, make sure that its heating chamber is deaerated and filled with the cooling liquid of the engine. Work of the dry heater with no liquid may result in permanent damage to the heater and loss of guarantee.
ADVANTAGE
Universal and simple installation
The heater EPS ELEKTROWARM has a compact structure and small mass. This allows to install it directly on the rubber conduit without an additional fitting it to the engine or the frame of the vehicle. This assures the possibility of universal use and facilitates installation. Diameters of the connectors within the range of between 30 and 70 mm enable connection of the heater to virtually all sizes of rubber conduits.
AUTOMATIC WORK
In the heater there is a thermostat which automatically turns the device off at, approximately, 60 ? and turns it on again at, approximately, 55°C.
HIGH RELIABILITY OF WORK
Reliability is guaranteed under the condition of correct installation of the heater and deaeration of the heating chamber, which are performed according to the manual. Even the smallest amount of air remaining in the heating chamber of the heater may block the circulation of the cooling liquid and this may be the reason of frequent damage to the heater.
INSTALLATION OF THE HEATER
The heater must be connected to the cooling system into the rubber conduit, connecting the cooler with the engine block, as close to the water pump as possible. Correctly installed heater, in order to work properly, should take one of the required positions.
Only the installation of the heater in the positions specified below guarantees efficient operation. Positions of the heater and the manner of installation are presented in the attached figures.
The figures are supplemented with the descriptive part below.
First position: The heater is fitted vertically, the longitudinal axis crossing the connector pipes is vertical or deviated from vertical by up to 20 degrees.
Second position: The heater is fitted obliquely, in such a manner that the longitudinal axis crossing the connector pipes is almost horizontal, with the lift towards the engine block not lower than 10 degrees.
In both positions of the heater the principle that the housing with the connecting cable is directed downwards must be observed.
Note!
Fitting the heater in the vertical position guarantees gravitational deaeration of the heating chamber and a correct, long exploitation without damage.
The heater fitted in the horizontal-oblique position requires absolute deaeration of the heating chamber. In order to perform the deaeration, after fitting the heater and refilling the liquid in the cooling system, the engine must be started for several minutes. The air from the cooling system, which concentrates in the upper part of the heating chamber must be efficiently purged several times, by unscrewing the deaerating valve, until there is certainly no air in the heating chamber.
Installation of the heater
1. A correct rubber conduit must be found and the place of installation must be specified. Make sure that the heater can be installed in one of the positions described above. Only these two positions of the heater guarantee complete deaeration of the heating chamber of the heater. The lower the heater is placed in the engine in relation to the upper level of the cooling liquid, the more efficiently it works.
2. The heater should be installed in a place distant from the fuel line and from hot or moving elements.
3. Suck partially the cooling liquid, make sure that the selected conduits are empty.
4. Carefully cut the necessary section of the selected conduit (rubber hose). Place the heater there, tighten the metal bands.
5. Refill the cooling liquid. Start the engine and maintain its work for several minutes in order to release the remaining air from the cooling system. Deaerate the heater Check whether there are no leaks and whether the level of the cooling liquid is correct.
6. The feeder cable must be separated from hot or moving elements.
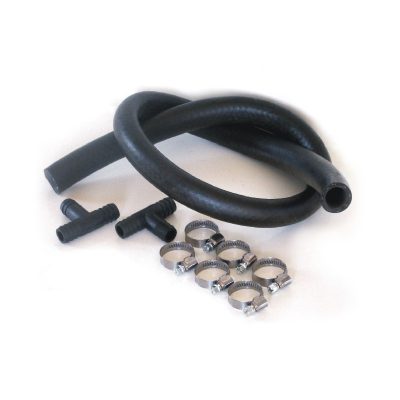
DEVICE COMPLETION
The heater is delivered with a feeder cable ending with a bipolar plug with a ground contact and worm band clips.
HEATING TESTS AND DEFECT REMOVAL
The heater test is performed after a correct installation of the heater, filling the system with the cooling liquid and its deaeration.
Switch the plug of the feeder cable to a grounded socket. Correct work of the heater is characterized by equal heating of the body of the heater and moving the heated liquid upwards, towards the engine block.
The heater installed this way heats continuously until it reaches the temperature when the thermostat works, i.e. approximately 60°C.
If the heater does not work as above, it should be turned off. Check whether it is not airlocked and deaerate it by placing the heater in a correct, required position specified above and unscrewing the deaerating valve located on the top of the heating chamber. Check whether the heater is filled with liquid, whether the level of the cooling liquid is correct, whether the rubber conduits are not bent (blocking flow of the liquid), whether the liquid is not frozen.
Engine heating lasts , depending on the ambient temperature and the size of the engine, from 40 to 120 minutes.


Reviews
There are no reviews yet.